No matter where you are at in your food photography journey, I hope these 15 tips and tricks that I’ve learned over the years will help you see immediate improvement!
1. Invest in backdrops
For years I would take my food photos on whatever surface I could find. A glass coffee table, the floor, a dimly lit kitchen counter…you get the picture. And while I’m a firm believer in using what you have, I have also come to see the value in investing in some backdrops when it comes to creating beautiful food photos. By having a few backdrops on hand, you can control how much your food pops and tell more of a story with your photos.
While some backdrops cost an arm and a leg, there are also lots of YouTube videos showing you how to create your own food photography backdrops for a fraction of the price. Additionally, there are now companies that sell affordable, stunning backdrops that are durable, roll up easily and wipe clean for easy clean up. One of my favorite companies is Ink and Elm!
Large tiles from Home Depot, old wooden boards nailed together and cheap vinyl countertop covers also make for great, affordable photography backdrops!
a collage showing the benefit of using a backdrop in food photography
LEFT: There was no backdrop used in this photo so you can see a messy couch in the background which distracts from the food.
RIGHT: Light colored backdrops make the food pop!
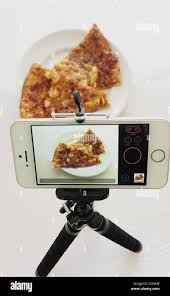
2. Buy a tripod and remote trigger
I don’t know about you, but there have been so many times in the past that I’ve done a photoshoot only to find that–when I go to edit my photos on my laptop — most of my photos are blurry. Ah, so frustrating! That’s why I started using a tripod and remote trigger. By using a tripod, you won’t have to worry about shaky hands when shooting your recipes. A tripod acts as another set of hands, allowing you to shoot crisp, beautiful food photos.
Additionally, a remote trigger not only allows you to take crisp photos by ensuring your shaky hands are no where near the camera, it also allows you to venture into the world of action photos. Imagine sweet maple syrup being poured over a stack of fluffy pancakes. Or vibrant, green cilantro being sprinkled over a pasta salad. I’ve had so much fun improving my food photography with just these two inexpensive items! Below I’ll list the first tripod I bought (super affordable), the tripod I have now and my remote trigger.
First Tripod: Amazon Basics 60-Inch Tripod and Bag
Current Tripod: Vanguard Alta Pro 263AB
Current Remote Trigger: Amazon Basics Wireless Remote Control for Digital Canon SLR Cameras
how to use a tripod and remote trigger to capture action in food photography
Both of these pour shots were made possible thanks to a tripod and remote trigger! No assistant needed!
3. Use props to highlight the food
Even though I’ve had this food blog for over 6 years, it hasn’t been until recently that I’ve started learning more about food props and purchasing certain dishes, cups, etc. specifically for shooting recipes. For years I would use whatever I had in my house, which was often shiny white, oversized dishes and crazy patterned bowls from my international travels. While I’m all about using what you have and not waiting to get started, I have found that investing in the right food props makes a huge difference in shooting beautiful, mouth-watering photos. Some of the tips I’ve picked up (slowly) along the way are listed below:
Go small! When you use smaller plates, bowls, cups, jars and utensils, your food will look more voluminous and appetizing. So for example, instead of having a small amount of food barely fill up a normal size bowl, use a small bowl so that the food overflows or at least fills up the bowl completely.
Choose matte. Especially if you’re just getting started with food photography, I highly recommend using dishes that have a matte finish. This means they aren’t glossy or shiny. By using dishes with a matte finish, you won’t have to deal with intense glare or shine on your dishes, which can distract from the food.
Find your style. The more you study food photos, you’ll notice that certain people use a ton of props and garnishes. Others photos, however, are more simple. If you like more simple styling, that’s great! I personally don’t like to use very many props in my food photos so that the food stands out. But if you like to use props to tell a story, that’s great too. You do you!
Invest slowly. The more you practice your food photography, the more you’ll realize what food props you actually need and which ones you can pass on. If you’re just getting started, there is no need to go out and buy a bunch of props. You may find you don’t use half of them! Instead, start with what you have and take note of what props, dishes, etc. will help enhance your photos.
a collage showing how to properly use props in food photography
LEFT: A stark white bowl adds glare and distracts from the food. The white bowl is also too big and swallows the food.
RIGHT: A neutral backdrop and a smaller, matte bowl allows the fruit to pop and look more voluminous. Including subtle details in the fallen hemp seeds and towel and second bowl in the background adds visual interest and eye-catching lines.
4. Learn the color wheel
The color wheel
If you want your food to pop and be eye-catching, then consider learning about the color wheel. I had no idea what the color wheel was until I took a food photography class (more on that later). Basically the color wheel shows you which colors are complimentary, which in turn can help you choose the perfect background and props to make your food pop.
To find complimentary colors, simply choose a color (usually the color of the food you are photographing) and see which color is directly across from that color. For example, if you are photographing whole wheat pumpkin muffins which look orange-ish, then blue violets would be the complimenting colors. To make your muffins stand out, you could then use a blue dish cloth or blue plates or a blue backdrop to make them pop!
Have fun experimenting with different color combinations to see what makes the recipe you are photographing look best!
A blue backdrop helps highlight orange energy bites
The blue background makes the tan/orange energy bites pop!
5. Learn about lighting
Figuring out lighting is crucial to improving your food photography. You can either use natural lighting (which is what I use) or invest in some equipment in order to use artificial lighting.
If you’re just getting started, definitely start with natural lighting. It’s the cheapest way to learn how to use your camera and improve in other areas like composition and styling.
Avoid direct sunlight which creates harsh shadows.
Try out different windows in your house.
Take photos at different times of day to see which times give you the best photos (but remember the best time of day will change depending on the time of year!)
Don’t shoot photos straight on (i.e. don’t photograph your food from the same direction that your light is coming from.) Experiment with side and back lighting!
A collage showing the difference between direct and back lighting in food photography
LEFT: Direct lighting makes the muffin look flat and uninteresting.
RIGHT: Back lighting adds shadow, shine and interest.
6. Learn how to use your camera’s manual mode
For the longest time I used my camera’s automatic mode. While there is no right and wrong when it comes to photography, if you want to improve your photography I definitely recommend learning how to use your camera on manual mode. There are three main settings when using manual mode: ISO, aperture and shutter speed. Once you know what each setting does and how to adjust them, you can remain in control instead of having your camera make the decisions. Let’s chat briefly about the three manual settings below:
ISO:
In short, ISO is the setting that will make your photo lighter or darker. As you increase the ISO number, your photos will get increasingly brighter and vice versa. However, if you raise your ISO number too high, your photo will look more grainy and less crisp. When possible, I like to leave ISO on the lowest. Check out restaurant consultants in kolkata


