How to Disable Windows Update in Windows 10 Permanently?
Turn Off Windows 10 Update
If you are a Windows 10 user, you must be aware of the quality updates that this operating system automatically downloads and installs as soon as they are ready. The purpose is to ensure that every device that has Windows 10 stays updated in all terms such as performance, stability, security patches, and other improvements. But the updates not only do well to our device but also can be annoying sometimes.
Most of the users have lately complained about Windows Updates and the reason is to apply them, they need to restart the computer. Moreover, sometimes the updates may negatively affect the user by making some unnecessary changes. To get rid of this interruption, you can turn off Windows 10 update.
For your edition of Windows 10, you can put a full stop on the automatic updates and regain control.
So if you are looking for ways to stop automatic updates, keep on reading.
Disable Automatic Updates Using Settings
If you want to install the updates sometime later, there is no need to disable them permanently. You can pause them for a period of time until you are ready to install them. Using the settings you can simply pause the updates for 35 days, here is how to do it:
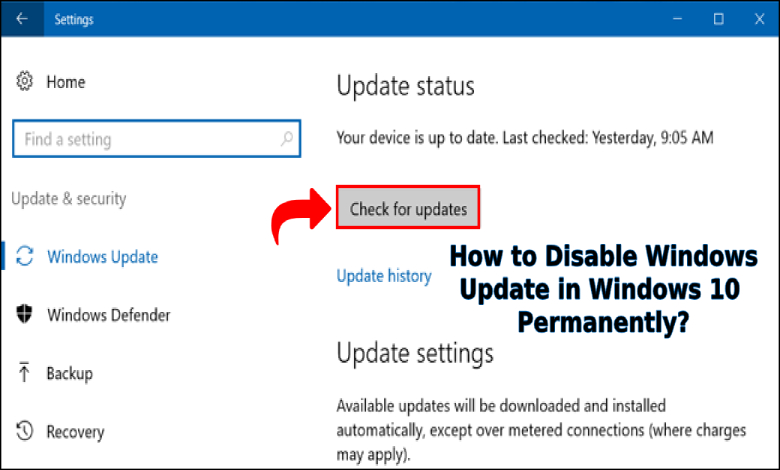
- Go to the ‘Settings’ section of your device and click on ‘Update and Security’.
- Then click on ‘Windows Update’ and thereafter click on ‘Advanced options’.

3. Under the ‘Pause Updates’ section, click on the ‘Pause Until’ drop-down menu and select the time range for which you want to disable the updates.
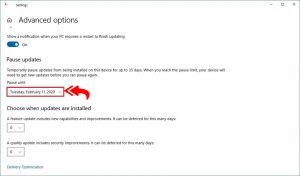
After this, your device will no longer download or install updates until the date that you have mentioned. However, when the time period is over, you will need to install the Windows updates and then the option will be available to you.
In case you want to undo the above steps, follow the same procedure but instead of selecting or you can click on the ‘Resume Updates’ button from the Windows Update settings page.
Disable Security Updates
Another option is to temporarily disable the updates by deferring only the quality updates up to 30 days. To disable the security updates, here are the steps you need to follow:
- Go to the ‘Settings’ corner of your device and then click on ‘Update and Security’.
- Then click on ‘Windows Update’ and next click on the ‘Advanced options’.
3. Again, under the ‘Pause Updates’ section, click the ‘Pause Until’ drop-down menu and choose the number of days for which you want to defer quality updates.

Once you are done with the above steps, your device will not download or install the monthly quality updates until the specified time limit is over. If you want you can even change the settings back to zero.
Disable Automatic Updates using Group Policy
If you have Windows 10 pro, you can use the Local Group Policy Editor to disable the updates permanently. You can even change the Windows Update Settings to select when to install the updates.
To permanently disable windows 10 update, here are the steps to be followed:
- Click on the ‘Start’ menu and search for gpedit.msc and select the result at the top to open the Group Policy Editor.
- Go to the following path: ‘Computer Configuration\Administrative Templates\Windows Components\Windows Update’.
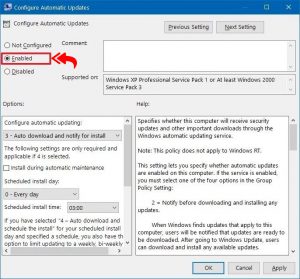
- Double-click on the ‘Configure Automatic Updates’ policy given on the right.

4. Select the ‘Disabled’ option to turn off the policy.

5. Click on the ‘Apply’ button and then press ‘Ok’.
After completing the above steps, Windows will stop downloading the updates automatically.
You can still download and install the patches manually even if the automatic feature is disabled. For this, go to Settings > Update & Security > Windows Update, and then click on the Check for updates option.
To re-enable automatic updates, you can follow the same steps given above to undo the changes but instead of selecting the ‘Disabled’ option, select the ‘Not Configured’ option.
Limiting the Updates
If the Group Policy method is not working for you, you can try customizing the Windows Update settings to limit the availability of updates for your device.
In order to control the Windows Update settings using the Group Policy, follow the steps listed underneath:
- Click on ‘Start’ menu and search for gpedit.msc and select the result to launch the experience.
- Go to the following path: ‘Computer Configuration\Administrative Templates\Windows Components\Windows Update’
- Double-click on the ‘Configure Automatic Updates’ policy given on the right side.
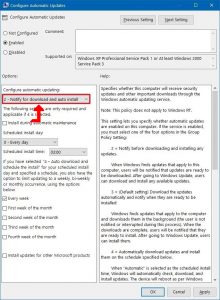
4. To turn on the policy, check the ‘Enable’ option.
5. From the ‘Options’ section, you will see a number of options to configure automatic updates:
2 – Notify for download and auto-install.
3 – Auto download and notify for install.
4 – Auto download and schedule the install.
5 – Allow the local admin to choose the setting.
To disable automatic updates, you can select the 2 – Notify for download and auto-install option, or whatever that fits your situation.
So, There are really valid reasons to disable windows 10 updates. You can use these methods to resolve them.