The Most Significant Way to Draw A Realistic Cat Step by Step. Have you ever had to draw a real-looking cat? Here is a simple step-by-step cycle to improve your drawing skills. In this exercise, you will learn how to Draw a realistic cat in 11 steps.
You’ll first draw a lineup, then add some simple lines and shapes to use as guides. It is called a flat pattern design, as seen in realistic Free Cat Coloring Pages.
Then draw your cat’s diagram by counting angles and bars. You’ll also use the figures as a guide, drawing on or inside them.
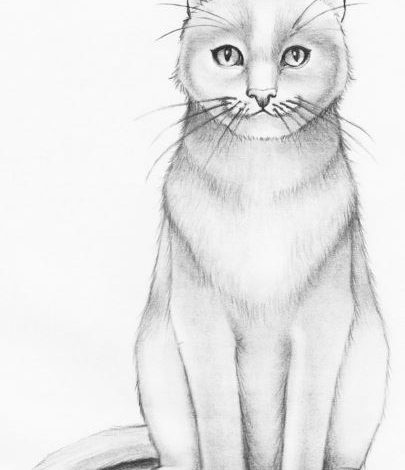
Finally, finish drawing your cat by adding simple strokes around the fur chart. You can use a blunt to add lamination and texture to go further. One way or another, your realistic cat will look amazing, as if he has shown some signs of life on his side!
Know the Essence and the End of the Cat life structures.
The most effective way to understand how to attract creatures is to focus on their vital structures. Take some leeway to focus on real cats and closely examine their positions, elements, and postures.
You can see real-life cat footage if you don’t have a cat.
You can also look at cat life drawings and books to focus on their bone and muscle structure.
Start with a Brief Illustration of a Stick Figure.
An easy way to better understand the evolution and inflections of cat life systems is to watch a real cat move as you say it quickly. Just draw it in the stick figure drawing style as you see here. For about 10-20 seconds, try to attract the entire cat. It doesn’t have to sound reasonable.
Collect Your Special Materials
To draw your cat, you only need a pencil and a piece of paper.
If you want to hide your cat, you need additional crafting materials.
- Piece of paper
- A pencil
- Strong Eraser
- A kneading eraser (or even a reusable banner marker is fine)
- Paper stump (discretion to mix a little later. You can buy it at a craft or art store)
A Step-by-step Guide For Drawing A Realistic Cat
We should spin it all by drawing a real cat.
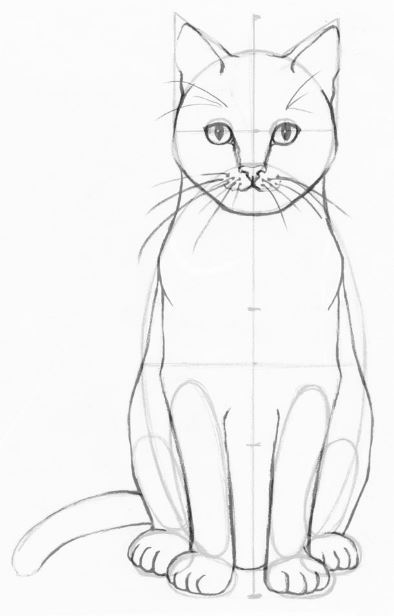
Step 1
Starting with your development drawing, gently draw an upward line of any length (I chose a length of 7 inches). You can use a ruler or draw your line using shoulder motion and a steady wrist to guide you. It is your upward focusing rule, and you will look at your sizes, points, and shapes on this line.
Tip: You should constantly make sure where your line begins and ends. Leave a footprint at the top and bottom of this upward line by defining a small even edge. I call it a card.
So, at that point, divide the top line. Then divide each part of your line again. It gives four equal divisions along the ascending line.
Tip: Measure each of the four sections to ensure they are a similar length. It will help you a lot in drawing the edges. You can quantify with the pencil by placing the tip at the beginning of a tab, pressing, reaching behind the pencil, and touching the other tab. Take your pencil to the next one and look at it. Adjust your divisions until they are more or less the same.
Step 2
Make sure you gently draw each of your shapes. The main shape to draw is a giant oval for your realistic cat’s body. Start with the highest point of your oval at the beginning of the final tab from top to bottom and finish slightly higher than the base.
Tip: To draw a comfortable oval, find a point between the top and bottom of the oval and define an even edge as a guide for how wide your oval should be. Mine was about three inches. You can draw your equivalent or approximation if you wish.
Step 3
Your cat’s head can start with a circle. We will add points and curves to refine the realistic cat’s face and elements later in the project’s design phase.
Start at the highest point of your circle just below the highest point of the center vertical line and finish when it is above and below the highest point of the giant oval body.
Draw on a flat ruler to help you make the width uniform on each top line side. I made my ring two inches lengthy and two inches broad. You can even roughly determine the width of your cat’s head.
Step 4
In this step, you attract two triangles prepared for adding curves to draw the ears later.
Start your triangle on one side by defining an upward boundary from an external perspective of the circle’s focal point upward and stopping at the full height of the vertical focal line. Do this on both sides of the cat’s head circle.
Tip: Keep this line aligned with your center vertical line.
Then you can finish each triangle by defining a sloping edge from the top of the ear shape of the triangle down to meet the circle. Do this on both sides. It creates a triangle for the cat’s ears on each side of the head.
Step 5
Now draw two larger ovals at the base of the circle for the two front legs.
Tip: Note that these two ovals are slightly apart. They are also at the same level as the base indicator on the top line.
Draw two more modest ovals a little higher on the page for the two hind legs. It makes them look a little further away than the ones in front.
Step 6
Now is the perfect time to complete your cat’s basic states by adding two huge ovals for the front legs and two more modest ovals for the hind legs.
Tip: The two largest ovals in the front reach just under half of the huge circular body. They stand on a slight point towards the outside. The more modest ovals for the hind legs are lower and point slightly outwards. The oval legs touch the ovals of your cat’s paws.
Step 7
Draw a small inverted triangle for your realistic cat’s nose. Notice how the triangle begins at the highest point of the huge body oval. A short flat line is drawn evenly on both sides of the vertical focal line.
Complete the shape of your inverted triangular cat nose by adding two diagonal lines (one at each end of the straight line) that conform to the vertical focus rule.
Add a calculated line on each side of the highest point of the nose to go up and continue until you pass the center error on your circle.
The cat’s eyes will similarly be added as small circles until further notice. Space them slightly apart, using the stitches you recently created to guide their placement.
Step 8
In this step, you will add the realistic cat project. Press gently as you move the shapes. Note where you should draw inside the shape and where outside the shape.
Tip:
- Keep the design you are duplicating aligned with your design.
- Put your finger on the curve you are drawing, aiming not to lose your place.
- Before drawing the fold or point, look at your duplicated drawing.
You can draw something well as long as you have seen it correctly. It is reasonable not to try it. You should ask yourself what the curve or point is doing and then record it at that point by drawing it on your page.
Our brain can remember everything one by one when we first draw, so take it one step at a time. Try not to be tempted to do this, or you may be amazed at your results.
Ask yourself, “Which direction is this curve going?” But accomplish say “left” or “right.” It also gets too long to feel around what’s left and right.
Step 9
At this point, you can refine the reflections on the face, starting with your cat’s eyes. Add more graphite along the highest point of the cover to gently cut the highest point of the circle. Try not to point it too low when heading to the nose line, or your cat will look grumpy. Keep the top of the base extremely curved.
Where you draw the nose, cover the inside of the nostrils and the shadow at the base of the nose. Add an inverted Y shape for the mouth.
Add the bristles last, using instantly drawn strokes as you release tension. Pull outward, starting from the face with a firmer touch on the cheek region. This way, your cat’s hair will be slightly thicker and dull at the base and thinner and finer as it moves away from the muzzle.
Step 10
Note the header I used for the little marks on the fur. Make your fur continuous to the base body. We will curve some strokes and others slightly straighter.
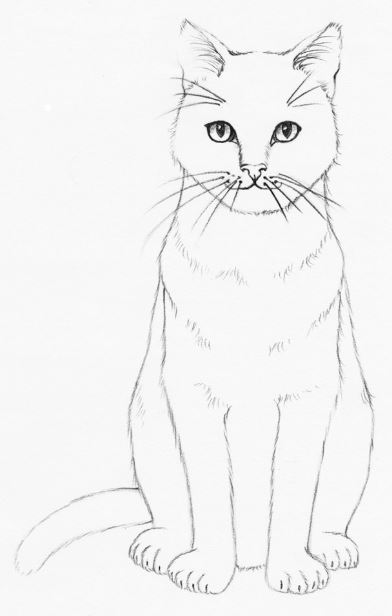
Tip: The fur on the face migrates upward and outward from the nose and eyes. See this photo for a cat illustration for a deeper understanding of fur design. At this point, you can call your realistic cat the finished project drawing or add more structure by hiding it in the next step.
Step 11
All you require for this action is a paper stump gently tracing the graphite around the image. You can start by hiding a hint of graphite on the softer shadows at the realistic cat foundation. Mix this region. You can use graphite on your stump to fuse different pieces of the cat.

You can also subtract some graphite from the fur regions, add more delicate strokes towards the fur, and then shade the region on a case-by-case basis. Sometimes you put the pencil down to add a little more graphite and mix again.
Drawing Completed
Also read: Instructions for drawing snowflakes: how to draw a snowflake